Wednesday, July 24, 2019

Ahh, that's better

After scratching my last version of Leslie and Trevan, I stepped away and got some things done around the property.  I spent weekends and a few evenings on the quilt and focused my energy during the day to my ever growing list of chores and projects.

I learned a few things that have been very helpful.  For instance, the Heat n Bond was leaving it too stiff and left the needle gummed up.  I switched to Steam n Seam 2 and I'm so happy with it.  It's a peel and stick kind of fusible sheet that you can reposition over and over until you decide to press it.  When you press it, it then becomes permanent.  I haven't actually ironed it yet, but I did semi-fuse it with my Clover mini craft iron.  It isn't completely permanent yet - I just need it to stay put until I stitch it in place.  But I really like how lightweight it is.

Speaking of thread, I'm a new convert to Superior Threads.  I didn't realize what a difference high quality thread would make.  Their MicroQuilter thread is so thin, it's almost invisible, but it's incredibly strong.  I can't wait to get to the quilting part of this project!

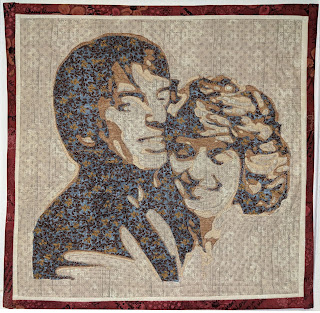
This is where I am with Leslie and Trevan.


I'm finally done cutting and fusing.  Once the teeth, eyelashes, eyebrows and other small outlining details are stitched, I'll share it again and then quilt it, bind it and move onto the next project.


Wednesday, May 29, 2019

Starting from scratch again

Have you ever worked on a project that wasn't going well but you kept trying different things to fix it because so much time and energy had gone into it?


Welcome to my world.  That's what has been happening with this portrait I'm working on. At first I thought I'd unpick it, but heavens, that would make it worse.  Plus, the laser cutter scorched the lighter fabric and I realized that my needle was too big. The thread was the wrong color and weight and I need to find a better way to fuse the fabric.  

After reading and learning a few things, I visited with my friend with the long arm machine and she gave me some neat ideas and options.  

So rather than feeling dumb that I should have been more conscientious, I'm going to learn from my mistakes and appreciate the knowledge that others are willing to share with me.

It's time to start over!

Related image


Saturday, May 25, 2019

Fabric layers in place

Putting these layers together to look like a person can be a challenge unless you have a transparent template to use as a guide.  When I first started, I would place the fabric by eyeing it and then iron the pieces in place to set the adhesive.  But when it started to look like a Picasso, I'd panic and use the iron to heat the adhesive to soften it and then lift the fabric to reposition it.  That's just fine until it's moved so often that the adhesive slowly disappears and the edges of the fabric become frayed.  That's when I started using pins to hold them in place until I was happy with it.

I mount it on a large piece of 1" thick foam board covered in fabric so I can use pins to hold the pieces in place while I arrange them.  It helps to occasionally tape it to the wall and step away to get a broader view.


It's getting there, but still needs a little work.  


Jump forward to today and the fabric is in place.  I've started quilting but it still has a ways to go.  I went to my friend's house and she let me use her long arm quilting machine for the stippling on the background.  I'm sure there's a learning curve, but boy that thing has a life of it's own.  If I were doing a larger quilt I can see how that would be so handy, but for my smaller projects I'm so much more comfortable using my home sewing machine!

I'll show you how it looks when I'm done quilting it.


Wednesday, May 8, 2019

Using Inkscape to create separate layers


(Disclaimer: If you're looking for a detailed tutorial,
run far and run fast.
This is solely to share my process) :D


I use Inkscape to break my posterized photo into four distinct vector layers for my quilted portraits. I've made applique quilts in the past by drawing the pattern on foundation paper and gluing it to the fabric.


For a great explanation with pictures, check out this tutorial. My Charlie Brown quilt was done this way and I love the effect it gives the panels. I've tried doing portraits that way but they just end up looking like Muppets.

Since I use a laser cutter to cut out the fabric, I need the lines to be completely smooth. A laser cutter will cut exactly what the file brings and unless an image has been vectorized, it will be pixelated and boxy. The smooth edges, however, can be scaled as much as you want without changing the nature of the lines. I only know enough Inkscape to do what I need to do. I found a Youtube tutorial that was made for complete beginners like me.

My goal here isn't to teach you how to use Inkscape. But rather just share my process with you. If you find you want to try this method for yourself, I'd recommend tutorials to learn the basics of the program, but I'm happy to answer questions if I'm able. Remember, I'm a n00b!

The first thing I do after choosing a photo is to trace the bitmap. That's in the file menu under Paths. A new window opens and I select Live Preview. There are quite a few options to choose from, but I'm choosing Colors under Multiple Scans in the dialog box. Grays work too but for now I like seeing the colors as I reduce the number of scans (layers).

I end up with six layers but will use only four. The very bottom layer is the background which gets tossed and the next layer is the base layer or foundation that the portrait is built on. So normally I don't cut that one out.

This is a comparison of the original photo vectorized in Inkscape (on the left) and the vectorized photo that was filtered first in Toolwiz Photos.


The photo on the right has four layers while the photo on the left has seven. I've tried using that many layers before but that's a lot of fabric and I like the detail I get with the Toolwiz filters. Plus it gets too bulky with the fabric, batting and fusible web and is difficult to quilt. And it looks too busy in my opinion.

To separate it into individual layers I use the Select Path by Nodes tool. I can highlight a single layer to display the squares and diamonds (nodes).


There are a couple of things I might do depending on the effect I want. By choosing Simplify in the Path file menu, the number of nodes will be reduced and the layer will lose detail but for some layers that's a good thing. For one thing it makes for a less complicated file for the laser cutter which speeds it up. And sometimes I will simplify parts of a layer, not the whole thing.


In this layer, for example I want the hair to be less defined but the eyes need to stay sharp. It may be hard to tell the difference in the details of the hair, but it really makes a difference when I cut it.

To edit just part of a layer, I need to break apart the elements, so I select it with the node selection tool, go up to the Path file menu and choose Break Apart. Anything in this layer that isn't physically connected will be converted into a separate.....words escape me.....thing (element? object?)


I learned the hard way that an object can also be a hole or blank spot within another object. If you don't remove it before you take it to the laser cutter, it won't show up.

Here's a tutorial designed for preparing text for laser cutting but the concept is the same.

When I'm all finished I'll save this as an .svg file. The quickest way for me to do this to the remaining layers is to undo undo undo undo until I'm back to the beginning and do it again with another layer (yeah, its unsophisticated but it works).

Once it's cut out, I'll share how I put everything together.


Monday, May 6, 2019

Editing a photo to enhance the details

I found a pretty nice photo editor that I use consistently. For a while I used Pixelmator and GIMP to prep my photo for Inkscape. But if you're like me and don't want to spend a lot of time messing around, searching through menus looking for the right filter and tweaking the photo over and over again, then you might want to try Pro Editor with Toolwiz Photos.


I was quite amazed at the amount of filters, tools and options. I thought about doing a tutorial for the apps I use but there are so many out there that are that are excellent for learning the ins and outs of the software. Instead, I'll try and share what I'm aiming for when I edit a photo.

Since every photo is different, each one will need different filters and effects. I took out the background with Background Eraser, another photo editor on my Android.

I started with the Enhance selection and chose Smart HDR. Within this tool there are thirteen filter to choose from. What I'm aiming for is a soft yet crisp image with defined features because I'm simplifying the photo down to four or five distinct layers.


Next go to the Photography selection and choose the Blur tool. Click Median and slide your finger across the photo to change the amount of blur. This photo didn't get a lot of blur but it's enough to take out a lot of the noise.


It's still not perfect yet. but it's getting there. Next it goes to the Filter tool. The filters are useful. There are different themes to choose from and some of the filters are repeated within different filter options. And you can find many of the most used filters in Fast Filter option.

I chose Brannan to bring out the details a little better while keeping the softness of the median blur.


Finally it goes into the Toning tool where you'll select Posterize. Again, the sliding tool adjusts how many layers it''ll have. I usually settle on seven or eight to start with but eventually it's reduced to four.


This photo shows the difference between posterizing the original photo vs the filtered photo. When I take it into Inkscape, you'll see why it matters.
I'll share that in the next post.

Thursday, April 25, 2019

How I learned to make portraits from fabric

I've always loved creating new things. Creativity can manifest itself in so many ways. Some people have a knack for watercolor, others are good at standing up in front of people and talking about whatever comes to mind. And others are good at coming up with a short-notice meal with whatever happens to be in their cupboards.

When I stumbled across a quilted portrait in my Pinterest search for quilts, I was mesmerized. I started searching for different styles and thought I'd like to try my hand at it. I bought a book called Portraits for Fabric Lovers by Marilyn Belford.


I got so much info from her that was helpful, however she uses more overhead transparencies and I am more software minded. So I took some of her ideas and came up with my own technique.

I use open source software. There are a few that I use consistently: Toolwiz Photos (Android). GIMP (GNU Image Manipulation Program) and Inkscape

There's a learning curve, but Youtube is invaluable. Several years ago I told an employer, "Yes, I can do that with Photoshop". I then went home and had my husband (who is a tech guru) teach me how. Once I learned the basics of Photoshop, learning other programs has been relatively easy. I'm told it's like learning a new language. Once you understand how to learn a new one, the next one isn't so difficult.

I'll go into the specifics of each program another time.

Monday, February 11, 2019

Info and Pricing


Your favorite photo is transformed into a quilted work of art.  


A quilted portrait takes a bit of time and goes through a process that involves several different software programs.

The fabric is then prepped and taken to the laser cutter for precision cuts.  Once I have the pieces cut, they're layered and tweaked, changed, rearranged, recut (maybe).  There's a lot of stepping away for a day or two so I can come back with fresh eyes.  Once I'm happy with the layout, it's fused and then quilted. 


I charge $0.85 per square inch.  This covers design, labor, fabric and supplies.  Your quilted portrait comes finished with a pocket on the back for hanging.   You'll need to make sure your photo isn't based on a copyrighted photo, licensed design or another artist's work.  I will need written permission from the copyright holder.


From this...


to this


If you have questions, don't hesitate to ask.
You can also request a specific color family.


If you're interested in having me create a unique, one of a kind portrait for you, please contact me and I will ask for a crisp, high resolution photograph.  I'll evaluate it and we will discuss details and the finished price.  I'll then send you an invoice for the non-refundable $25 deposit through Venmo or PayPal.  I'll get started right away and keep you updated.

Please email me if you have any questions!


Friday, February 8, 2019

Turning photos into art


A photograph is one thing, but transforming it into a quilted piece of art is delightful.
I have a passion for fabric and textiles and have an itch to create something unique. 


On the technical side of things, graphic design and photo editing software is magic to me. I enjoy tweaking, editing and filtering photos just to see what kind of effects and abstract images I can pull out.


I use several software programs and a laser cutter for precision cuts. Once I have the photo distilled down to a few layers and I'm happy with the layout and design, the high quality cotton fabric is prepped, cut, assembled, fused and quilted.


It's a perfect gift idea for parents with an upcoming anniversary, or to remember a loved one who has passed on.